For the upcoming holidays, I’m trying out new desserts, pastries, and finally it is time to make the famous “Snickers“ cake. As always, I confess, it took me quite some time to get ready to bake this cake. First of all, each cake takes not only a lot of time and effort, but also nerves – will it come out good, will it be stiff or will it be a success? When I layer a cake, I always worry and think whether the next day will at least stand in its place, no creams will “run out“ and in general, I hope the cake is edible (after all!). I think these worries are familiar to those who have baked a cake at least once in their life.
After putting all the worries aside, I can tell you that the “Snickers“ cake came out great from the first time – the sponges rose up, the creams stiffened, and I just couldn’t wait to cut and taste the cake! Since I am a big fan of chocolate and caramel, this cake was fantastic for me.
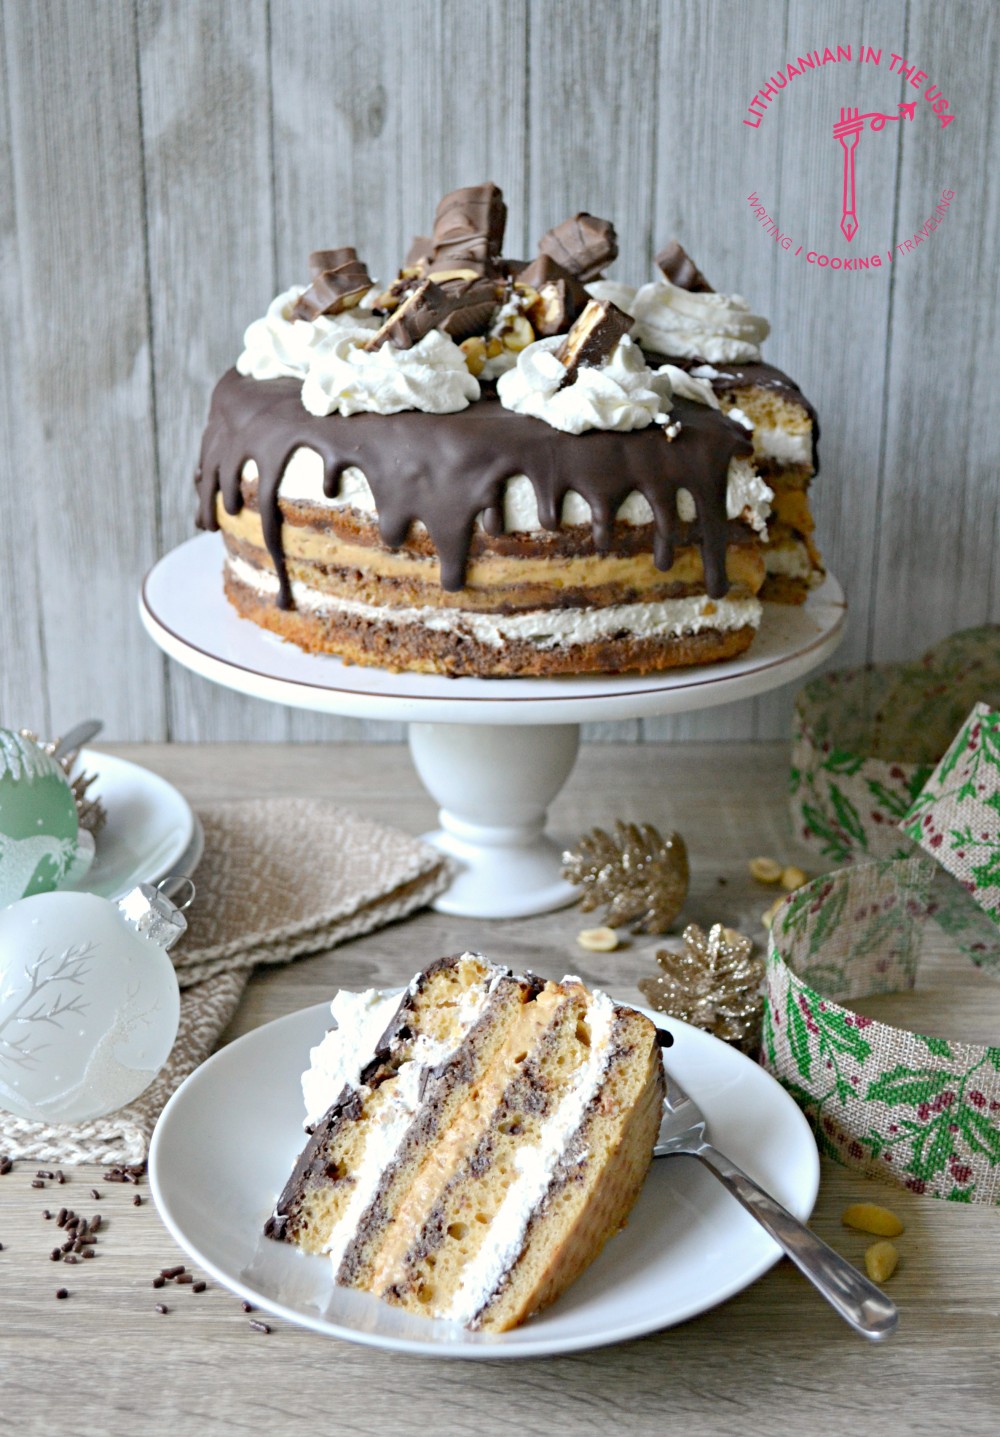
A few observations about making the cake. Don’t be afraid to use roasted, salted peanuts!! Salty peanuts create a much-needed and necessary sweetness/saltiness balance that goes well with caramel and dark chocolate. Another important thing – before you make your cake, remember to leave the can of caramelized milk at room temperature to soften (if you forget it, remove it from the can and heat up in the microwave for a very short time). The caramelized milk I used was very soft, so I didn’t have to follow this step. But in Lithuania caramelized milk called “Rududu“ is quite hard, so it is necessary to make it softer. Decorate the cake as you like. I use peanuts, “Snickers“ chocolate bar and other chocolate sweets. Although without any decorations the cake is unbelievably good! Bon appetit for everyone 🙂
You can find the recipe source here.


{12 servings}
Ingredients:
{sponges}
1/2 can carmelized sweet milk (eg Dulce de leche), at room temperature
200 g (3/4 cup) sour cream
200 g (1 1/3 cup) all purpose flour
100 g (1/3 cup) granulated sugar
2 eggs
2 tbsp. baking powder
2 pinches of salt
{chocolate syrup}
150 g (5.5 oz) dark chocolate
150 ml (2/3 cup) milk
{whipped cream}
450-470 ml (1 pint) heavy cream, cold
2 tbsp. cofectioners’ sugar
{caramel cream}
1/2 can carmelized milk (eg Dulce de leche), at room temperature
100 g (1 stick) unsalted butter, at room temperature
50 g (couple handfuls) roasted, lightly salted peanuts
{chocolate glaze}
150 g (5.5 oz) dark chocolate
3 tbsp. vegetable oil
Preparation:
- Sponges – preheat the oven to 180 C (350 F). Beat eggs with sugar. Beat for about 5-6 minutes until the batter doubles in size and becomes whitish in color. Add caramelized milk, sour cream and mix. In another bowl, mix the flour with baking powder and salt. Slowly sift the flour into the batter and lightly mix it. Do not overmix. Divide the batter into two bowls. I baked sponges in 20 cm (8 inches) diameter springform pan. Lay down parchment paper on the bottom of the pan, grease the pan with butter, add batter and bake for 15-20 minutes. After 15 minutes, check the sponge with a wooden toothpick if it’s done. If the toothpick comes out covered with the batter, then bake for couple more minutes. In this way bake both sponges. Then leave them to cool completely after removing from the pan. When they cool off, carefully cut the sponge bumps and cut sponges in half.
- Chocolate syrup – melt chocolate in a microwave. Heat up milk to body temperature, then mix with melted chocolate. Set aside.
- Whipped cream – whip the cream using an electric mixer until it begins to thicken, then add confectioners’ sugar and mix until the cream becomes thick and won’t fall from whisks. Just don’t overmix, that it wouldn’t become grainy. Keep whipped cream in a fridge until you start layering the cake.
- Caramel cream – beat well caramelized milk and butter, then add peanuts. Set the cream aside.
- Layering the cake – put the first sponge cake in the same springform pan, spread a quarter of the chocolate syrup and then a third of the whipped cream. Add another sponge cake, spread chocolate syrup and all caramel cream. Add a third sponge cake, spread chocolate syrup again and half of the remaining whipped cream. Add the last sponge cake, spread the remaining chocolate syrup. Cover the cake with plastic wrap and leave it in the fridge overnight. Also store the rest of the whipped cream in the fridge.
- Chocolate glaze – melt chocolate in a microwave, mix it with oil.
- Cake decoration – carefully go around the edges of the cake with a knife, remove the springform pan sides, smooth cake sides and cover the cake with chocolate glaze (don’t use any spatula, simply our the glaze on the cake). When the glaze cools down, decorate the cake with the remaining whipped cream. Decorate as you like. Enjoy!!!!
You might also like:


Šokoladinis-karamelinis tortas „Snickers“
Artėjančių švenčių proga eksperimentuoju naujus desertus, kepinius ir pagaliau atėjo laikas išbandyti žymųjį tortą “Snickers“. Kaip visada, prisipažįstu, man prireikė nemažai laiko prisiruošti iškepti šį tortą. Visų pirma, kiekvienas tortas atima ne tik daug laiko ir pastangų, bet ir nervų – ar išeis, ar sustengs, ar pavyks?? Bent jau aš susluoksniavusi tortą visada jaudinuosi, ir galvoju, kad tik sekančią dieną, kai išimsiu tortą iš tortinės, jis bent jau stovės savo vietoje, jokie kremai “nenubėgs“ ir apskritai, tikiuosi, kad tortas būtų valgomas (juk sudėta tiek vilčių!). Manau šis jauduliukas pažįstamas tiems, kad bent kartą gyvenime yra kepę tortą.
Nustūmus visus jaudulius šalin, galiu pasakyti, kad “Snickers“ tortas man išėjo iš pirmo karto – biskvitai iškilo, kremai sustengo, o aš tiesiog negalėjau sulaukti, kada bus galima tortą prapjauti ir paragauti! Kadangi aš esu didelė šokolado ir karamelės gerbėja, tad man šis tortas buvo fantastiškai nuotabaus skonio 🙂 Rekomenduoju visiems be išimties, kepkite, ragaukite ir mėgaukitės puikiu skoniu!
Keletas pastebėjimų gaminant tortą. Nebijokite naudoti skrudintų, sūdytų žemės riešutų!! Sūrūs riešutėliai sukuria labai būtiną, ir reikiamą saldumo/sūrumo balansą, kuris puikiai dera su karamele ir juoduoju šokoladu. Dar vienas svarbus dalykėlis – prieš gamindami tortą nepamirškite karamelizuotą pieną palikti kambario temperatūroje, kad šis suminkštėtų (jeigu pamirštote, išimkite iš skardinės ir labai trumpai pašildykite mikrobangėje). Mano naudotas karamelizuotas pienas buvo ir šiaip labai minkštas, tad to daryti neprireikė. Bet lietuviškas karamelizuotas pienas “Rududu“ yra gana kietas, dėl to jį būtina “suminkštinti“. Tortą puoškite kaip Jums patinka. Aš naudojau žemės riešutus, “Snickers“ šokoladuką ir kitus šokoladinius skanėstus. Nors ir be jokių papuošimų tortas yra nerealus! Skanaus visiems 🙂
Recepto šaltinį rasite čia.
{12 porcijų}
Reikės:
{biskvitams}
0,5 skardinės karmelizuoto saldaus pieno (pvz.: „Rududu“), kambario temperatūros
200 g (3/4 stiklinės) grietinės
200 g (1 1/3 stiklinės) miltų
100 g (1/3 stiklinės) cukraus
2 kiaušinių
2 arb. š. kepimo miltelių
2 žiupsnių druskos
{šokoladiniam pertepimui}
150 g juodojo šokolado
150 ml pieno
{grietinėlės kremui}
450 ml plakamosios grietinėlės (35 % riebumo), šaltos
2 valg. š. cukraus pudros
{karameliniam kremui}
0,5 skardinės karmelizuoto saldaus pieno (pvz.: „Rududu“), kambario temperatūros
100 g sviesto, kambario temperatūros
50 g (poros saujų) skrudintų, lengvai pasūdytų žemės riešutų
{šokoladiniam glaistui}
150 g juodojo šokolado
3 valg. š. aliejaus
Gaminimas:
- Biskvitai – orkaitę įkaitiname iki 180 C. Kiaušinus išplakame su cukrumi. Plakame apie 5-6 minutes, kol masė padvigubėja ir tampa balsva. Sudedame karamelizuotą pieną, grietinę ir išplakame. Kitame dubenyje sumaišome miltus su kepimo milteliais ir druska. Miltus pamažu įsijojame į tešlą ir lengvai išplakame. Nereikia perplakti. Tešlą padaliname į dvi dalis. Aš biskvitus kepiau 20 cm skersmens išardomoje kepimo formoje. Ant kepimo formos dugno patiesiame kepimo popierių, patepame sviestu, supilame tešlą ir kepame 15-20 minučių. Po 15 minučių patikriname biskvitus mediniu dantų krapštuku ar iškepę. Jei krapštukus aplipęs tešla, tuomet kepame dar pora minučių. Taip iškepame abu biskvitus. Po to juos paliekame visiškai atvėsti išėmus iš formos. Kai atvėsta atsargiai nupjauname biskvitų iškilimus ir perpjauname biskvitus perpus.
- Šokoladinis pertepimas – šokoladą išlydome mikrobangėje. Pieną pašildome iki kūno temperatūros, tada sumaišome su išlydytu šokoladu. Atidedame į šalį.
- Grietinėlės kremas – grietinėlę plakame elektriniu mikseriu, kol pradeda tirštėti, tada suberiame cukraus pudrą ir plakame, kol kremas pasidaro tirštas ir nebekrenta nuo mikserio plakimo šluotelių. Tik neperplakite, kad grietinėlė nesušoktų į gumulėlius. Grietinėlės kremą laikome šaldytuve, iki kol pradėsime sluoksniuoti tortą.
- Karamelinis kremas – karamelizuotą pieną ir sviestą gerai išplakame, kad neliktų gumulėlių, po to įmaišome žemės riešutus. Atidedame į šalį.
- Torto sluoksniavimas – į tą pačią kepimo formą (su kraštais) dedame pirmąjį biskvitą, ištepame ketvirtadaliu šokoladinio pertepimo ir trečdaliu grietinėlės kremo. Dedame antrajį biskvitą, ištepame šokoladiniu pertepimu ir karameliniu kremu. Dedame trečiajį biskvitą, vėl tepame šokoladinį pertepimą, pusę likusius grietinėlės. Uždedame paskutinį biskvitą, ištepame likusiu šokoladiniu pertepimu. Tortą uždengiame plastikine plėvele ir paliekame šaldytuve stengti pernakt. Likusią grietinėlę taip pat laikome šaldytuve.
- Šokoladinis glajus – šokoladą išlydome mikrobangėje, sumaišome su aliejumi.
- Torto puošimas – torto kraštus atsargiai apipjauname, nuimame formos kraštus, atsargiai palyginame torto kraštus ir apliejame (nereikia tepti!) šokoladiniu glaistu. Kai glaistas atvėsta puošiame tortą likusiu grietinėlės kremu. Puošiame kaip patinka. Skanumėlis!!!!
Jums taip pat gali patikti:

It looks beautiful!
PatinkaPaspaudė "Patinka": 1 person
Thanks dear!! :))
PatinkaPaspaudė "Patinka": 1 person
YUMMMMM!!
PatinkaPaspaudė "Patinka": 1 person
That looks decadently delicious!!!!!!
PatinkaPaspaudė "Patinka": 1 person
Thank you so much :))
PatinkaPaspaudė "Patinka": 1 person
You are very welcome.
PatinkaPaspaudė "Patinka": 1 person
I don’t even like snickers but this makes me want to have a big slice! Looks amazing x
PatinkaPaspaudė "Patinka": 1 person
Trust me, this is 10 times better than the actual Snickers bar 😀
PatinkaPaspaudė "Patinka": 1 person
wow that looks amazing!
PatinkaPaspaudė "Patinka": 1 person
Thank you! 🙂
PatinkaPatinka